Step-by-Step Guide: Setting Up React, TypeScript, and Tailwind CSS with Vite for Your Next Project
Getting
started with modern web development doesn’t have to be complicated! This
step-by-step guide will walk you through setting up a powerful, efficient
development environment using React, TypeScript, Tailwind CSS, and Vite.
Combining these tools gives you a fast, scalable, and customizable foundation
for building exceptional web applications. Whether you're a seasoned developer
or new to this tech stack, this guide simplifies each step so you can
confidently kickstart your next project!
In
this guide, we’ll use VSCode to set up a modern web development
environment with React, TypeScript, Tailwind CSS, and Vite. Vite has replaced
the now-deprecated Create React App as a fast, reliable, and versatile tool
that can integrate with frameworks like React and Vue.
Getting
Started
- Check Node.js Installation: Ensure Node.js is installed by running node -v in the command prompt. If not, download it here, and make sure it’s version 18 or higher.

- Create a Solution Folder: Open a new folder as your project root. You can do this in VSCode with the command . code.
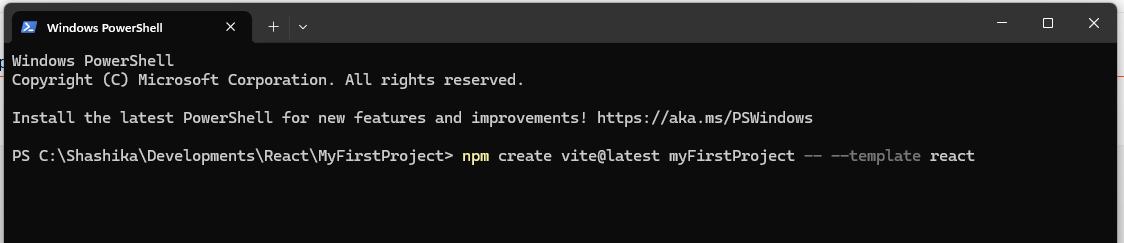
- Scaffold a New Project with Vite: Visit the Vite website for details, but to get started, use the following command in the terminal
npm
create vite@latest my-FirstProject -- --template react
- Navigate to the Project Folder: Enter your new project folder by running:
cd
myFirstProject

- Install Dependencies: Run npm install to install the required packages.
Once
these steps are complete, To run the project locally, navigate to your project
folder in the terminal and use: npm run dev
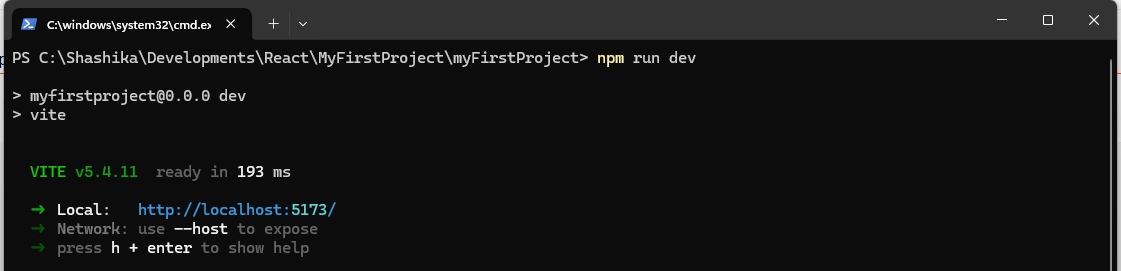
Congratulations—you now have your first React project set up with Vite!


Now we see how to install and configure Tailwind CSS in your Vite + React project:
For more details on installing and configuring Tailwind CSS, you can visit the official Tailwind CSS website. The documentation provides comprehensive steps and examples to help you fully integrate Tailwind into your project and start using its utility classes to style your application effortlessly.
- Install
Tailwind CSS and Dependencies:
Run the following command in your terminal to add Tailwind and its
dependencies: "npm
install -D tailwindcss postcss autoprefixer"
- Initialize Tailwind CSS: Generate Tailwind’s configuration files with: “npx tailwindcss init -p”

- Configure Tailwind in tailwind.config.js: Add the following paths in the content array to enable Tailwind to scan your files:

- Add Tailwind Directives to CSS: In your main CSS file (e.g., index.css), include the following:

We add Tailwind directives to your main CSS file (e.g., index.css) to instruct Tailwind to inject its base styles, components, and utility classes into your project. The three directives (@tailwind base;, @tailwind components;, and @tailwind utilities;) tell Tailwind where to insert its default styles, components (like buttons, forms, etc.), and utility classes that can be used to style elements quickly and consistently across your application. Without these directives, Tailwind’s styles won’t be applied.
Note : If you're seeing warnings in
VSCode while working with Tailwind CSS, you can install the Tailwind CSS
IntelliSense extension. This extension provides enhanced features like
autocompletion, linting, and hover previews, making it easier to work with
Tailwind CSS in your project and reducing errors in your code. Simply search
for the "Tailwind CSS IntelliSense" extension in the VSCode
marketplace and install it to improve your development experience.
Congratulations!

You’ve successfully set up a React project with TypeScript and Tailwind CSS using Vite. Now you're ready to start building modern, responsive web applications with a fast and efficient development workflow.
Happy coding ❤️


Comments
Post a Comment