Posts

Showing posts with the label SharePoint

Add "Edit Item" Column to SharePoint online list

Image
 In this blog I will show you how to add edit item button to the SharePoint online list as below  Steps  Create a new Calculated Column as "Edit Item"   In the Additional column settings change the formula as follow. In the Column formatting section add the following script   {   "$schema": "http://columnformatting.sharepointpnp.com/columnFormattingSchema.json",   "elmType": "button",   "customRowAction": {     "action": "editProps"   },   "style": {     "border": "none",  "background-color": "transparent"   },   "children": [     {       "elmType": "span",       "attributes": {         "iconName": "Edit"       }     }   ] } ----- Thanks & Happy Coding ------ 
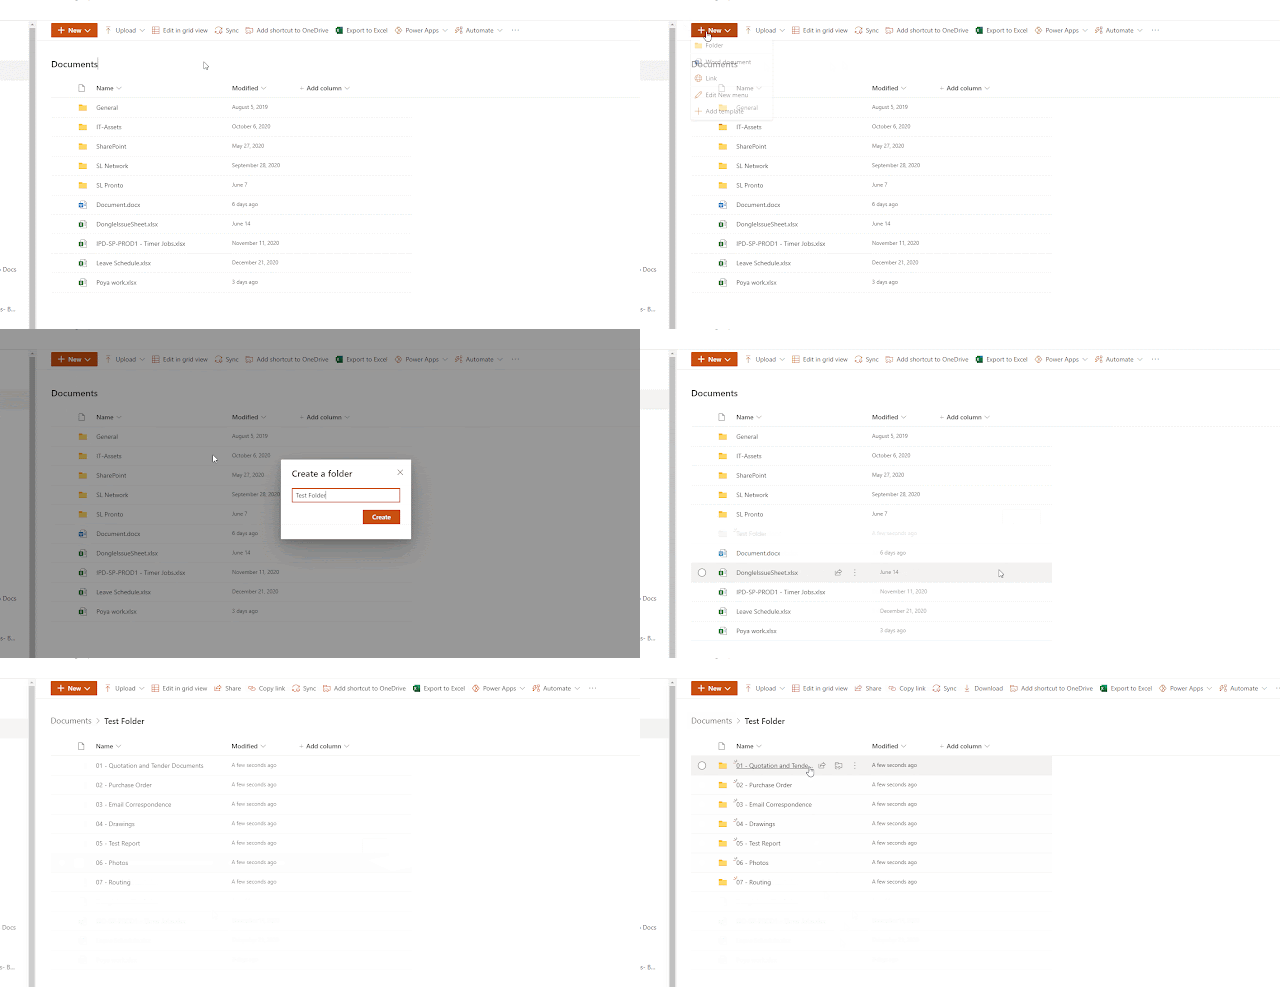
Create Sub folders when you create a new folder in SharePoint online Document Library - Power Automate

Image
In this blog post I will explain how Power Automate can be used to dynamically create sub folder structure in a SharePoint document library when a new folder is create. I will explain how to create an MS Flow which would perform the below series of actions, User creates a New Folder in the root folder of a SharePoint document library MS Flow is triggered to automatically created the following folder structure "Folder Name /  01 - Quotation and Tender Documents " "Folder Name /  02 - Purchase Order " "Folder Name /  03 - Email Correspondence " "Folder Name /  04 - Drawings " "Folder Name /  05 - Test Report " "Folder Name /  06 - Photos " "Folder Name /  07 - Routing " Email will sent to the user after the folder creation. Steps  Create a new “Automated – from blank” Flow. Provide a name for the Flow i.e. “Folder Create”; select the “When an item is created” SharePoint trigger and then click “Create”. Set the “Site Ad...

How To : (Solved) SharePoint Open Pop-up Form using Nintex Forms

Image
In this post I'm going to demonstrate how to open a pop-up from using Nintex forms Implementation So, simply follow the steps mentioned below. Crate a new Custom JavaScript button. Go to Control Settings of button and add the following  On the Form Settings page add the following JS code on the "Custom JavaScript" section  function redirectToRFIForm(){ var options = { title: "Your Title", url: 'http://mysite/sites/page.aspx', dialogReturnValueCallback:Function.createDelegate(null, portal_modalDialogClosedCallback)}; SP.UI.ModalDialog.showModalDialog(options); }   ----------- Happy Coding ----------- 

Solved : Nintex - Show/Hide Panels according to user permissions

Image
If you want to disable/hide controls according to user groups or single user you can archive by using the following methods Show / Enable Nintex form controls only to Specific SharePoint User Group Create a new rule Add the following Condition  Code snippet : fn-IsMemberOfGroup("YourSPGroupName") Note :  use  double quotation  marks when using your group name. Show / Enable Nintex form controls only to Specific (People picker) user  Create a new rule Add the following Condition  Code snippet :  not(userEquals( Current User , YouPeoplePickerName )) Thank you : Happy Coding !!

Nintex Forms : Print to PDF, hide the Control Buttons (Custom JavaScript Button)

Image
If you wants to hide the Save, Cancel buttons while you printing your Nintex form, please follow the bellow steps Add a new button to your form designer  Go to "Control setting" of the Button  Figure 1 : Custom Button Control Settings  Add the Settings as above in the Figure 1 Use the below code for the Client Click field :  NWF.FormFiller.PrintToPDF.PrintToPDF(); Add a CSS Class to the controls that you wish to hide during print command (Figure 2) Figure 2 : CSS Class Use the below CSS script on the form control settings Nintex Form > Settings > Custom CSS                 @media print {                 .myButton {                      visibility: hidden! important;                           }         ...

FIX : stsadm is not recognized as an internal command

Image
If you try to run SharePoint STSADM.exe in powerShell and getting this error To resolve the error message you need to edit the profile.ps1 file Its located in C:WINDOWS\SYSTEM 32\WindowsPowerShellL\v1.0\ if the profile.ps1 file dose not exists, just create a new file and add the following code Set-Alias -Name stsadm -Value $env:CommonProgramFiles"\Microsoft Shared\Web Server Extensions\15\BIN\STSADM.EXE" Happy Coding  !!!

FIX : The password supplied with the username Domain\Username was not correct. Verify that it was entered correctly and try again.

Image
This will happen often while trying to create a new web application in SharePoint 2013 central administration site. It gives the following error This usually occur when farm account password is expire and it's password is changed or simply farm account password is changed. In that case, sometimes password stored in SharePoint database is different in Active Directory, so unable to create web application from central admin.  In order to resolve this problem you need to update SharePoint 2013 farm credentials using "STSADM" tool. For that Open PowerShell in administration mode then write the following code stsadm -o updatefarmcredentials -userlogin <UserAccount> -password <New-password> Example : Once you receive operation completed successfully message do a IIS reset !! FYI : In case if you getting an error message " stsadm not recognized as an internal command " Follow these instructions.. Happy Coding !! ...

Validate SharePoint Special Characters on File Upload name - C#

You cannot use the following characters in a document name when you upload the document in SharePoint Site o    Number sign (#) o    Tilde (~)   o    Percent (%) o    Ampersand (&) o    Asterisk (*) o    Braces ({ }) o    Backslash (\) o    Colon (:) o    Angle brackets (< >) o    Question mark (?) o    Slash (/) o    Plus sign (+) o    Pipe (|) o    Quotation mark (") Here is the method to check that the documents contains any special characters     protected bool IsValidFilename(string fileName){               string pattern = "[\\~#%&*{}/:<>?|\"-]";               try               {                   if (...

How to Reset the List Item ID

Image
How to Reset the List Item ID value numbering at 1 One of the most common problems we in SharePoint lists , there  is no direct way , the value of the ListItem ID reset. In development  environment we used to insert and delete a lot of records and during this time  ID value automatically increases as the ID column is an up counter type.  Finally , when we move to staging and production environments, the website with  backup and restore the ListItem -ID value will not start with 1 . One way of preventing this problem is update the content Database ListID value to 1 Get The specific content database Name Go To the Central Admin Application Management Click on Manage Content Database            Select the specific web Application Database Name will be shown Get The specific List ID (GUID) Method A 1.        Navigate to the list and click  ...